Router · NEC Platforms
NEC Aterm login, restart, firmware and UPnP
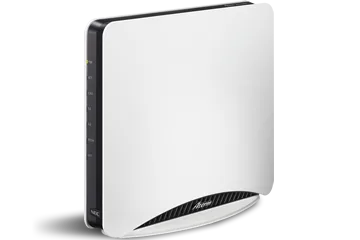
Aterm is NEC Platforms’ range of home Wi-Fi routers sold across Japan. You manage it in a browser through クイック設定Web (Quick Setup Web), and from a phone with the Atermスマートリモコン app.
- Sign in
aterm.meor192.168.10.1- App
- Atermスマートリモコン (iOS and Android) opens クイック設定Web and 見えて安心ネット from a phone.
- Password
- The user name is
admin. The admin password starts as the Web PW printed on the label stuck to the router: eight letters and digits on current models, six digits on the WG2600HS. - Models
- Aterm WX11000T12, Aterm WX7800T8, Aterm WX5400HP, Aterm WG2600HS
Sign in to the Aterm
Join the Aterm’s Wi-Fi on the primary SSID, or plug in with Ethernet.
Open
http://aterm.me/in a browser, orhttp://192.168.10.1/if you haven’t changed the address.Enter
adminas ユーザー名 (User name) and the admin password, then click ログイン (Log in).To change the password, go to メンテナンス › 管理者パスワードの変更 (Maintenance › Change admin password).
Ten wrong passwords lock the login until you power the router off and on. Devices on the secondary SSID can’t open the settings, because network separation is on there by default. In bridge mode the address changes; the app finds the router for you. If you forget a changed password, hold the RESET switch with a toothpick until POWER blinks red (6–10 seconds); this erases all settings.
Restart it properly
Sign in to クイック設定Web.
Click メンテナンス › 再起動 (Maintenance › Restart).
Click 再起動 (Restart), read the message and click OK.
Wait for 再起動が完了しました。 (Restart complete). Don’t switch the router off meanwhile.
Click 設定 (Save) on any changed page before restarting, or the change is lost. The pinhole RESET switch is a factory reset, not a restart.
Schedule a restart
The Aterm manuals describe no scheduled restart. Automatic firmware updates restart the router when they install.
Update the firmware
Sign in and click メンテナンス › ファームウェア更新 (Maintenance › Firmware update).
Click 更新 (Update) and wait while it fetches the latest version.
If the latest version is newer than the current one, click 最新バージョンへ更新 (Update to latest version).
Click OK and leave the power on until it restarts.
Automatic updates are on from the factory. 時刻指定バージョンアップ機能 (Timed update) on the firmware page installs every update at a set time; メンテナンスバージョンアップ機能 under 詳細設定 › その他の設定 (Advanced settings › Other settings) installs important fixes. Settings are kept. On FLET’S lines it can update even before IPv4 is set up.
See connected devices
Sign in and click 見えて安心ネット (See-and-relax Net) in the menu bar at the bottom.
The home screen lists the devices the router manages; identify each by its MAC address.
Tap a device to name it and set its 端末区分 (Device type), then tap 設定する (Save).
For a map of the mesh, click ネットワーク図 (Network map) in クイック設定Web.
Marking a device as 不正な端末 (Unauthorised device) blocks it from the Wi-Fi. That works only for Wi-Fi devices, not wired ones.
UPnP and port forwarding
Sign in and click 詳細設定 › その他の設定 (Advanced settings › Other settings).
Set UPnP機能 (UPnP) to ON or OFF.
Click 設定 (Save).
UPnP is on by default in the modes that support it. It lets any app on your network open ports to the internet without asking, which malware can use too. Leave it on only if a game console or call app needs it.
IPv6 (IPoE) modes
UPnP works only in PPPoE router mode and local router mode. In v6プラス, transix, クロスパス, OCNバーチャルコネクト and other IPv4 over IPv6 modes the manual doesn’t list UPnP.
NAT-PMP
The manual lists no NAT-PMP setting.
Prioritise calls and gaming
Open 見えて安心ネット from クイック設定Web or the app.
Turn on 優先通信 (Priority traffic) on its home screen.
Tap a device and choose 高, 中 or 低 (High, Medium, Low) under 優先度 (Priority).
Tap 設定する (Save).
Priority applies to downloads to Wi-Fi devices only, not uploads or wired devices.
2.4 and 5 GHz, and the channel
Band steering puts 2.4, 5 and 6 GHz under one network name. It is tied to the mesh switch, so turning it off also turns off mesh.
Sign in and click Wi-Fi(無線LAN)設定 › Wi-Fi基本設定 (Wi-Fi settings › Basic Wi-Fi settings).
Set メッシュWi-Fi機能 (Mesh Wi-Fi) to OFF to split the bands, or ON to merge them.
Click 設定 (Save), then reconnect devices to the new per-band names.
Change the channel
Click Wi-Fi(無線LAN)設定 › Wi-Fi詳細設定(2.4GHz) (Detailed Wi-Fi settings), or the 5GHz or 6GHz page.
Set オートチャネルセレクト機能 (Auto channel select) to 使用しない (Off).
Pick the channel and click 設定 (Save).
使用する(拡張) (On, extended) keeps rechecking for a better channel while the router runs. W53 and W56 channels on 5 GHz may jump when radar is detected.
Mesh: which node a device uses
Sign in on the mesh parent and click ネットワーク図 (Network map).
Each device appears under the parent or the mesh repeater it is connected to.
Click 更新 (Refresh) after a device moves.
Use Aterm models that support Aterm mesh as repeaters: up to nine, at most two hops deep. Devices on a repeater’s secondary SSID don’t show on the map. Roaming between nodes needs devices with 802.11k and 802.11v.
Guest network
Aterm has no separate guest network. The secondary SSID, printed on the label, does the job: リモートワークWi-Fi(ネットワーク分離機能) (Remote-work Wi-Fi, network separation) is on there by default.
Sign in and click Wi-Fi(無線LAN)設定 › Wi-Fi詳細設定(メッシュ/バンドステアリング) (Detailed Wi-Fi settings, mesh/band steering).
Under 対象ネットワークを選択 (Select network), choose セカンダリSSID (Secondary SSID).
Set Wi-Fi機能 (Wi-Fi) and リモートワークWi-Fi(ネットワーク分離機能) to ON.
Click 設定 (Save).
With band steering off, use the per-band Wi-Fi詳細設定 pages instead. Separated devices reach the internet but not your other devices or the router’s settings.
DNS settings
Sign in and click 基本設定 › 接続先設定 (Basic settings › Connection settings).
Set サーバから割り当てられたアドレス (Address assigned by server) to OFF.
Enter プライマリDNS (Primary DNS) and, if you like, セカンダリDNS (Secondary DNS).
Click 設定 (Save).
This works only in local router and PPPoE modes. In the IPv4 over IPv6 modes the manual offers no IPv4 DNS setting; set DNS on the Mac instead.
Connection status and logs
Sign in. The top of the home screen shows the mode and internet connection state; click 最新状態に更新 (Refresh).
For details such as IPv4 and IPv6 status and the firmware version, click 情報 › 現在の状態 (Information › Current status).
メンテナンス › PINGテスト (Maintenance › Ping test) checks whether an address answers.
The manuals for these models describe no event log.
Manuals and downloads
Links go to the maker’s own pages.
Questions
Why can’t I find the UPnP or DNS settings?
Most Japanese fibre plans now run Aterm in an IPv4 over IPv6 mode such as v6プラス or transix. Those modes hide UPnP and the IPv4 DNS fields. They appear in PPPoE and local router modes.
Why can’t I open aterm.me from my phone?
If the phone is on the secondary SSID, network separation blocks the settings pages. Switch to the primary SSID or use a wired computer.
Sources
- Aterm WX11000T12 user manual: Using クイック設定Web
- Aterm WX11000T12 user manual: Restart
- Aterm WX11000T12 user manual: Firmware update
- Aterm WX11000T12 user manual: Automatic update and maintenance service
- Aterm WX11000T12 user manual: Factory reset
- Aterm WX11000T12 user manual: UPnP
- Aterm WX11000T12 user manual: 見えて安心ネット home screen
- Aterm WX11000T12 user manual: Check connected devices
- Aterm WX11000T12 user manual: Band steering
- Aterm WX11000T12 user manual: Stable Wi-Fi (channels)
- Aterm WX11000T12 user manual: Mesh network
- Aterm WX11000T12 user manual: Remote-work Wi-Fi (network separation)
- Aterm WX11000T12 user manual: WAN IP and name servers
- Aterm WX11000T12 user manual: Check, save and restore settings
- Aterm WG2600HS user manual: Using クイック設定Web
Checked on 1 November 2026.
See what your router can’t tell you
Kilobat is a Mac menu-bar app that watches the network from your side: which app is using it, whether the Wi-Fi, the router or the provider is slow, and why a call froze.
brew install seifip/kilobat/kilobat