Mesh system · NETGEAR
NETGEAR Orbi login, restart, firmware and UPnP
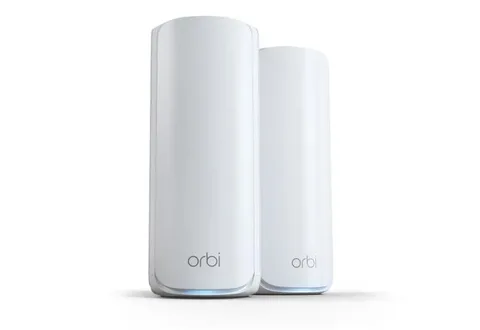
Orbi is NETGEAR’s mesh Wi-Fi system: one Orbi router and one or more satellites. You manage it in a browser at orbilogin.com, or in the Orbi app on a phone.
- Sign in
orbilogin.comororbilogin.net- App
- The Orbi app (iOS and Android)
- Password
- The user name is
admin. The password is the one you created when you set the Orbi up. The Wi-Fi name and password are on the label underneath the router. - Models
- Orbi WiFi 7 (RBE series), Orbi WiFi 6E (RBKE series), Orbi WiFi 6 (RBK series), Orbi AC (RBK50, RBK40, RBK20), Orbi satellites (RBS, RBE, RBW)
Sign in to the NETGEAR Orbi
Factory default. Older Orbi manuals give admin and password as the defaults. Newer Orbi systems have you set your own password during setup. If yours still uses the default, change it under ADVANCED › Administration › Set Password.
Connect your Mac to the Orbi network by Wi-Fi or Ethernet.
Open
http://orbilogin.comin a browser.Enter
adminand the Orbi password. Both are case-sensitive.
The admin password is not your Wi-Fi password or your NETGEAR account. If you turned on Enable Password Reset, you can reset it with your security questions. Otherwise, hold the Reset button until the power LED blinks amber; this erases all settings.
Restart it properly
NETGEAR’s RBE771 and RBE770 manual describes a short Reset-button press to restart the router or satellite. Check the manual for your model before using Reset.
On an RBE771 router or RBE770 satellite, find the Reset button.
Press it for less than five seconds with a paper clip; holding it can erase the settings.
The power LED turns solid amber while the Orbi restarts.
On the RBE771 and RBE770, holding Reset until the power LED blinks amber restores factory settings. A restart keeps your settings; check the instructions for your exact model.
Restart the whole network
Turn off and unplug the modem, then turn off the Orbi router.
Plug in the modem, turn it on and wait two minutes.
Turn on the Orbi router and wait two more minutes.
Schedule a restart
NETGEAR’s Orbi manuals describe no scheduled restart.
Update the firmware
Orbi updates the router and satellites automatically by default.
Sign in at
orbilogin.com.Go to ADVANCED › Administration › Firmware Update › Online Update.
Click Check, then Update All if new firmware is found.
To keep automatic updates, leave Enable selected and click Apply.
The router and satellites restart when done, after about two minutes. Don’t close the page or switch anything off. For a manual update from the Manual Update tab, update each satellite first, one at a time, then the router.
See connected devices
Sign in at
orbilogin.com.On the BASIC tab, select Attached Devices.
Under Connected Devices, read each device’s name, IP address, MAC address and connection type.
The Connected Orbi column shows whether it is on the router or a satellite.
Click a device name to change its name, type or group, then click Apply.
UPnP and port forwarding
Orbi supports UPnP, and it is on by default.
Sign in and go to ADVANCED › Advanced › UPnP.
Tick or clear Turn UPnP On, then click Apply.
Check the UPnP Portmap Table to see which devices opened which ports. Click Refresh to update it.
With UPnP off, no device can open ports on the Orbi by itself. That is safer, but some games and calls may then need ports forwarded by hand. The Portmap Table shows any device opening ports you didn’t expect.
NAT-PMP
NETGEAR’s Orbi manuals don’t mention NAT-PMP, and there is no setting for it.
Port forwarding instead
Go to ADVANCED › Advanced › Port Forwarding / Port Triggering to open a port for one device by hand.
Prioritise calls and gaming
Orbi has no QoS or traffic priority page. The only QoS in NETGEAR’s Orbi manuals is WMM, which gives Wi-Fi voice and video traffic priority automatically. ADVANCED › Advanced Setup › Traffic Meter can cap monthly data, which is not the same thing.
2.4 and 5 GHz, and the channel
The main network broadcasts on 2.4, 5 and, on tri-band WiFi 7 models, 6 GHz under one name, with band steering. You can’t turn a band off on it. Orbi WiFi 7 adds a separate IoT network for smart-home devices.
Sign in and select Wireless on the BASIC tab.
Under Wireless IoT Settings, tick Enable IoT Network.
Choose 2.4 GHz only for devices that can’t use 5 GHz.
Note the IoT name and password, then click Apply.
Change the channel
On the Wireless page, pick a number from 2.4 GHz Channel or 5 GHz Channel.
Click Apply. The router sends the change to the satellites.
NETGEAR advises changing the channel only when you see dropouts or slow transfers. The change applies to every Orbi network, guest and IoT included.
Mesh: which node a device uses
Satellites link back to the router over a backhaul, by Wi-Fi or Ethernet.
Sign in and select Attached Devices.
Under Connected Satellites, read each satellite’s connection type and Backhaul Status.
The Connected Orbi column shows whether it links to the router or another satellite.
For more detail, type the satellite’s IP address into the browser and sign in with the same admin login.
A satellite only appears while it is connected. NETGEAR recommends keeping the router and satellites out of basements, attics and cupboards.
Guest network
Sign in and select Guest Network on the BASIC tab.
Tick Enable Guest Network and change the name if you like.
Under Security Options, choose WPA2-PSK or WPA2-PSK + WPA3-Personal.
Enter a password and click Apply.
The guest network has no password by default: security is set to None until you pick one.
DNS settings
Sign in and select Internet on the BASIC tab.
Under Domain Name Server (DNS) Address, select Use These DNS Servers.
Enter a primary DNS address, and a secondary one if you have it.
Click Apply.
To go back to your provider’s servers, select Get Automatically from ISP.
Connection status and logs
Sign in and click the ADVANCED tab, which opens on the router status.
In the Internet Port pane, click Connection Status for the WAN IP, gateway and DNS servers.
Click Show Statistics for uptime and live traffic on each port.
For the event log, go to ADVANCED › Administration › Logs.
The log keeps up to 256 entries. Renew in the Connection Status window restarts the internet connection.
Manuals and downloads
- NETGEAR Orbi RBE770 user manual (PDF)
- NETGEAR Orbi RBK50 user manual (PDF)
- NETGEAR Orbi RBE770 support
- Firmware downloads
Links go to the maker’s own pages.
Questions
Is orbilogin.com the same as orbilogin.net?
Yes. NETGEAR’s pages use both, and both open the Orbi router’s web interface from a device on the Orbi network.
Can I give a smart plug its own 2.4 GHz network?
On Orbi WiFi 7, use the IoT network set to 2.4 GHz only. The main network always shares one name across bands.
Sources
- NETGEAR: Orbi WiFi 7 RBE771 router and RBE770 satellite User Manual (PDF)
- NETGEAR: Orbi WiFi System RBR50, RBR40, RBR20 User Manual (PDF)
- NETGEAR Support: How do I reset my Orbi WiFi System to factory default settings?
- NETGEAR Support: How do I back up the configuration settings on my Orbi WiFi System?
- NETGEAR Support: What are the default user interface passwords for NETGEAR devices?
Checked on 1 November 2026.
See what your router can’t tell you
Kilobat is a Mac menu-bar app that watches the network from your side: which app is using it, whether the Wi-Fi, the router or the provider is slow, and why a call froze.
brew install seifip/kilobat/kilobat